6.1.1
Suitable and unsuitable materials
- Suitable materials can withstand strong heat and do not shrink or wear. Straw is especially suitable; it can resist strong heat for a long time without changing its structure
- Hay is less appropriate as it tends to get moldy in damp weather conditions
- Rags should not be used; they might act well with heat and can slump down over time
- Avoid cavities while the filling of the insulation material. It is best to stack the material (for example straw) with the fibers upright
- Do not stuff in too much insulation material. Otherwise the inner box might buckle out and riveting the bottom of the outer box might become difficult
|
|
6.2
Reinforcing the bottom of the box, insulating the cooker and riveting the bottom
6.2.1
Cutting wooden reinforcement parts
For reinforcing the bottom of the inner box, a 5 mm plywood panel is placed underneath. Thus, heavy pots will not cause the bottom to bend
 Clip 6.1 Clip 6.1
| 1 |
0:00 |
Wooden strips are used for pressing the plywood panel to the bottom. The strips are fixed with wedges |
| 2 |
0:03 |
Cut wedges from a 30 mm board. If a 30 mm board is unavailable, a thinner board might serve as well, if 30 mm wide stripes can be cut from it |
| 3 |
0:12 |
Cut the 30 mm wide strips to form wedges
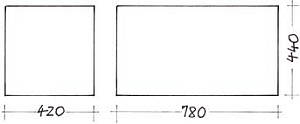
- Measurements of the 4 mm plywood panels:
440x420 mm for the Ls
440x780 mm for the Lw
- Measurements of the wooden strips*:
525 mm x ca. 60 mm and approx. 20 mm thick.
(The exact width of the battens must still be found out)*
*) One time task: Finding the exact width for the battens
The cooker is placed upside down.
A strip 60mm wide and about 500 mm long is pushed. It must fit underneath the flange.
(The exact distances are slightly different in front and rear, as well as in the Ls and the Lw.)
If the strip is too wide, it has to be cut somewhat smaller. The strips can be clamped with one or two wedges. (No Video Clip)
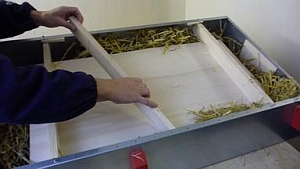
Position a batten with a length of approx. 50 cm and a width of approx. 60 mm on top of the plywood panel
and under the front and rear flange of the box. See that it fits in everywhere (The size may vary a bit between
front and rear). If necessary, slim down the batten by cutting it. The batten is clamped down by one or two wedges.
|
|
 |
6.2.2
Insulating the cooker, Step 1, and placing the reinforcing panel of plywood beneath the bottom of the inner box
Clip 6.2
| 1 |
0:00 |
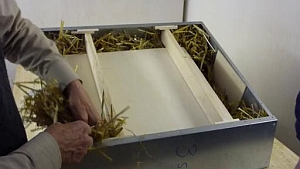
Insulating step 1: Before placing the reinforcement panel in its position, put hand formed wisps of straw horizontally between the inner and outer box. |
| 2 |
0:30 |
Place the plywood panel on the bottom of the inner Box. Then place the two wooden strips on top of it |
| 3 |
0:45 |
Press the front and rear strip with one or two wedges |
| 4 |
1:04 |
Apply some glue to the wedges and reinsert them
|
|
|
6.2.3
Insulating the cooker - Steps 2 and 3
Clip 6.3
| 1 |
0:00 |
Insulating step 2: Set more wisps next to each other in an upright position. Beware of cavities, feel for them and if you find any, fill them meticously |
| 2 |
0:34 |
Insulating step 3: Fill all remaining cavities between the strips with horizontal wisps |
| 3 |
0:58 |
Check the insulation using a batten |
|
 |
6.2.4
Preparing for riveting the bottom to the outer box
Clip 6.4
| |
- |
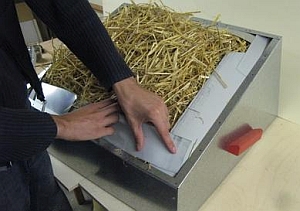
Cut strips approx. 80 mm wide from offset sheet scrap. (No Video Clip) |
| 1 |
0:00 |
Insert the strips all around beneath the flanges. They keep the straw away from the rim |
| 2 |
0:21 |
Remove any insulating material that is on top of the wooden strips |
| 3 |
0:36 |
Place the bottom panel on the box and check with a batten that the insulation material is not to thick |
| |
- |
Remove the Bottom panel again. Drill 3.2 mm holes about 6 mm deep through those holes in the flaps underneath which are strips and wedges. (no Video Clip) |
|
 |
6.2.5
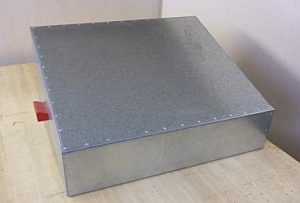
Placing the bottom plate and riveting it
The bottom panels have already been cut and drilled in sect. 1.5.3. In sect. 5.2 holes were drilled in the bottom flaps of the outer box, The bottom is now riveted to the insulated box from below.
Clip 6.5
| 1 |
0:00 |
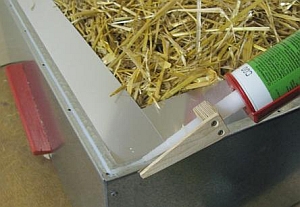
Use nozzle guide Jig 5.2 to apply silicone on the flaps of the box |
| |
- |
Place the bottom plate and temporarily fix it at two diagonally opposite corners with rivets (No. 2) (no Video Clip) |
| 2 |
0:11 |
Press down the bottom plate with a batten and fix the middle rivets in opposing positions, front and rear, left and right. Align the holes with the aid of a pricker or a nail |
| 3 |
0:22 |
Continue riveting, each time working from the middle rivet to the corners |
| |
- |
Remove squeezed out silicone after drying. (no Video Clip) |
|
|